If you have installed Nutanix Community Edition as a Virtual Machine in VMware Workstation or Fusion then you might want to reduce the Memory and CPU allocation assigned as part of the install. This will help ease the potential for contention on your physical machine especially if it is short of CPU & Memory. It should be noted that reducing the resources of the CVM will impact some of the features on Nutanix CE like Inline Compression and Deduplication.
My example is being run on VMware Fusion and using Terminal on the Macbook Pro
Logging On & Checking Details
- SSH onto the AHV server of the Nutanix CE. This will be the other IP that you assigned to the cluster and not the CVM IP.
- Default Username : root Password : nutanix/4u
- Once logged in type:
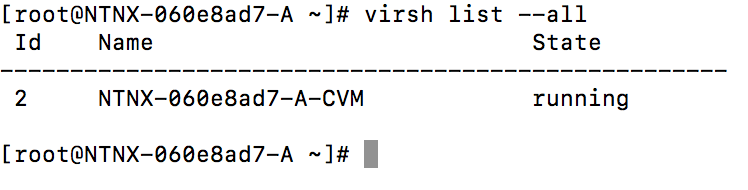
- virsh list –all
- This will list all the CVM in the cluster. In my case I only have one in the cluster and it’s name is NTNX-060e8ad7-A-CVM. You’ll need to edit the below commands for your CVM name(s)
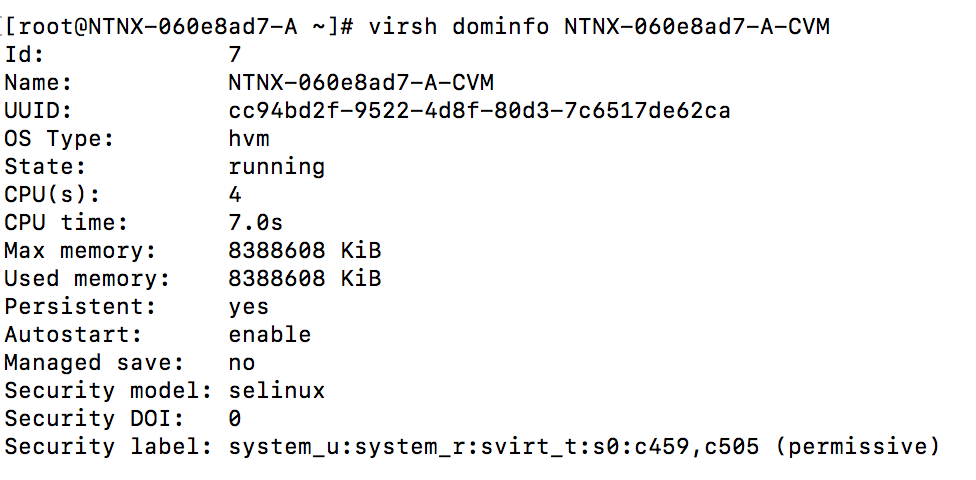
- To get the configuration information of the CVM run:
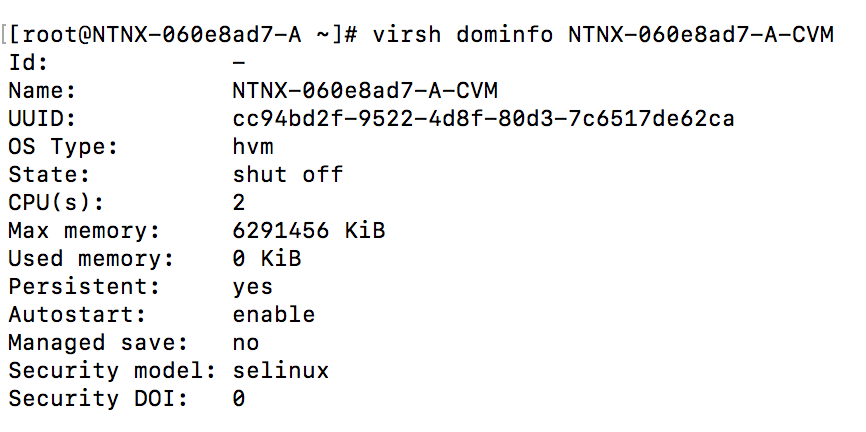
- virsh dominfo NTNX-060e8ad7-A-CVM
- My CVM has 4 CPU and 8GB RAM. I’m going to change it to 2 CPU and 6GB in this example
- To make the changes first shutdown the CVM with command:
- virsh shutdown NTNX-060e8ad7-A-CVM
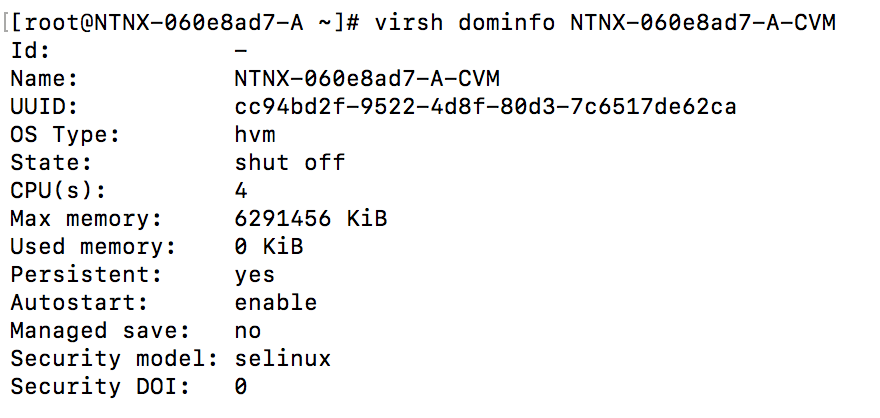
- Check to make sure the CVM is shutdown with:
- virsh list –all

Changing Memory Allocation
- Once the CVM is shutdown run these commands to change the configured memory to (in this example) 6GB:
- virsh setmaxmem NTNX-060e8ad7-A-CVM 6G –config
- virsh setmem NTNX-060e8ad7-A-CVM 6G –config

- Running the command:
- virsh dominfo NTNX-060e8ad7-A-CVM
- This confirms that the memory has been changed to 6GB
- If the CPU also needs to be changed move onto the next section
- If you don’t need to change the CPU allocated to the CVM then run:
- virsh start NTNX-060e8ad7-A-CVM
- This will start up the CVM & bring your Nutanix cluster up
Changing CPU Allocation
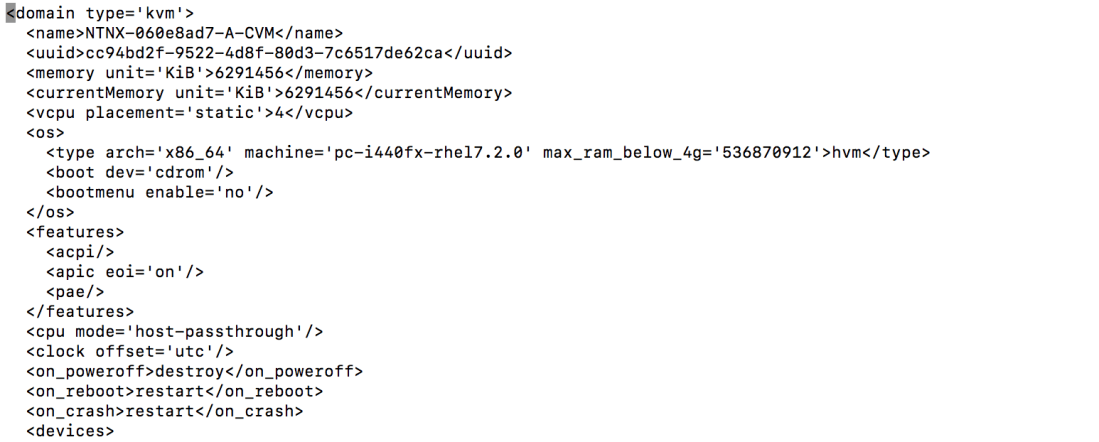
- To change the amount of CPU’s allocated we need to edit the virsh XML file.
- Running the following command opens up the XML file:
- virsh edit NTNX-060e8ad7-A-CVM
- The file lists out the configuration of the CVM. It is very much like the VMware .VMX file. You can see the memory and CPU allocated below. You’ll notice the memory is already at 6GB
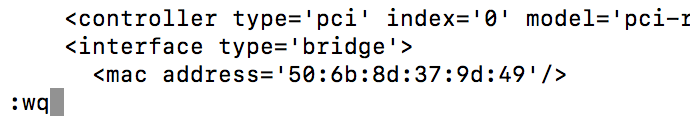
- This will open the VM XML file using vi editor. The line we are interested in changing is:
- <vcpu placement=’static’>4</vcpu>
- We need edit the XML so will have to put VI into insert mode. To do this Press ‘i’. You see — INSERT — appear at the bottom of the screen

- Use the arrow key to move to the line we want to edit

- Change the CPU number to what you want. In my example I’ll change it to 2 CPU

- To exit Insert mode press ‘Esc’ key. You see the — INSERT — disappear from the bottom of the screen
- Next step is to save changes to the XML file then quit out. This can be done by typing ‘:wq’ then hitting return. The typing appears at the bottom of the screen
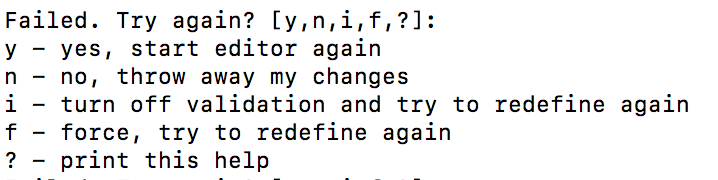
- You might get the following message in the screenshot below. Press ‘i’ to turn off validation and commit the change

- Pressing ‘?’ gives information on what each letter means
- Now the edits have been completed run
- virsh dominfo NTNX-060e8ad7-A-CVM
- Check the new configuration changes are being reflected. You can see in the screenshot the CVM is now set to 6GB and 2 CPU
- To start the CVM run the command:
- virsh start NTNX-060e8ad7-A-CVM

- Check the CVM has started correctly by running:
- virsh list –all

- It can take 5 mins or so for Prism Element to start up. Once it is available log on and check CVM configuration details. This can be found by going to Menu -> VM -> Table (you might have to click ‘Include Controller VMs’ checkbox to see the CVM)


Thanks this helped me out for my home lab
LikeLike
Thanks. Glad it could help.
LikeLike
Great blog on CVM untouched commands. Thanks
LikeLike
Pleased it was able to help out. Thanks for the message.
LikeLike